
Yesterday, I attempted to explore the concept of contained databases. Today, we will see how to create our first contained database in the very latest SQL 11 (“Denali”) CTP01.
(If you intend to follow along, you will need a instance of SQL 12 or higher)
To get us back into context, let’s revisit the definition of a contained database:
“A contained database has no external dependencies on server-based settings or metadata to define the database. Users defined in a contained database do not have a dependency on logins created on the server, and therefore contain all information necessary to authenticate a user within the database.”
Creating a “contained” database
Here is a step-by-step guide to create your first “contained” database:
Assumption: It is assumed that the reader have fair amount of exposure to SSMS and SQL Server database fundamentals before beginning this exercise.
- Login to the SQL Server Management Studio (SSMS)
- Right-click on the Server instance name in the Object Explorer and click “Properties”
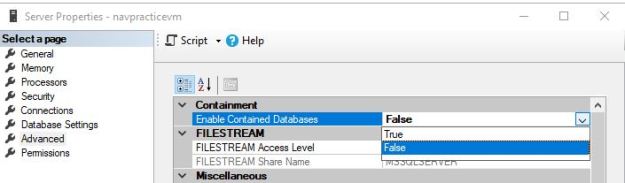
- Select the “Advanced” page
- Set the “Enabled contained databases” to TRUE
- Now, restart the SQL Server Instance by right-clicking the instance name in SSMS and selecting “Restart”
- After the restart, log back into SSMS, right-click on the Database node and select New database
- Name the database “ContainedDB”
- Navigate out to the Options page and select the containment mode as “Partial”
- Click “OK” to create the database

T-SQL to enable containment
--Enabled Advanced options
sp_configure 'show advanced options',1;
RECONFIGURE
GO

--Enabled Database Containment
sp_configure 'contained database authentication',1;
RECONFIGURE;
GO

--Disable Advanced options
sp_configure 'show advanced options',0;
RECONFIGURE;
GO
T-SQL to create a partially contained database
--Notice that we now have a new option - CONTAINMENT!
USE [master];
GO
CREATE DATABASE [ContainedDB]
CONTAINMENT=PARTIAL
ON
( NAME = Sales_dat,
    FILENAME = 'C:Program FilesMicrosoft SQL ServerMSSQL11.MSSQLSERVERMSSQLDATAContainedDB.mdf',
    SIZE = 10,
    MAXSIZE = 50,
    FILEGROWTH = 5 )
LOG ON
( NAME = Sales_log,
    FILENAME = 'C:Program FilesMicrosoft SQL ServerMSSQL11.MSSQLSERVERMSSQLDATAContainedDB.ldf',
    SIZE = 5MB,
    MAXSIZE = 25MB,
    FILEGROWTH = 5MB ) ;
GO
Creating a contained user within the newly created contained database
- Login to SQL instance used in the test above via SSMS
- Using the Object Explorer, navigate out to “ContainedDB”->Security
- Right-click on “Users” and choose “New User”
- In the New User dialog, enter the user name and password of your choice to create a new user. I created a user called “ContainedUser”
- Navigate out to the Membership page, and select the “db_owner” checkbox
Let’s Login!
It’s time to login to SQL Server using our newly created user. But wait! Don’t we need that this database user is mapped to a login? No! That’s the whole beauty of contained databases!
- In the Object Explorer, click on the Connect drop-down list and choose “Database engine”
- Change the authentication to “SQL Server Authentication”
- In the login name and password boxes, pass in the login name and the password of the user created in the steps above
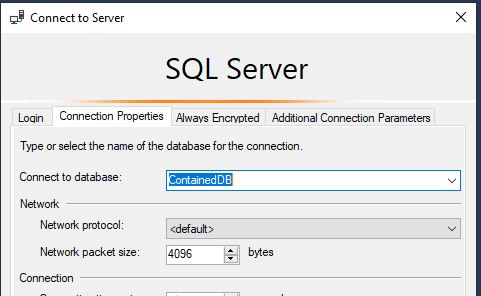
- Do not hit “Enter” key or click on “Connect”. Instead, click on the “Connection Properties” tab
- In the Connect to Database box, type in the name of the contained database, in our case “ContainedDB”
Now click on “Connect” to connect to the SQL Server - Notice the level of rights that this user is granted

NOTE: Although the user (ContainedUser) had db_owner membership, the server/instance-level objects are not exposed to this user under this connection.
Does this database contain any non-contained entities?
So, now that the database and the users are created and login process tested, it is essential to ensure that the database is indeed contained and there are no uncontained entities.
Launch a new query editor window using the contained database connection created above, and execute the following query against the “ContainedDB”
USE [ContainedDB];
GO
SELECT * FROM sys.dm_db_uncontained_entities;
GO
You should only see one record for the ROUTE class_desc. This is expected.

Some finer points…
- Only the partial containment mode is supported currently
- The following entities are not allowed in a partially contained database
- Uncontained tables (for example, a table that uses an uncontained function in a constraint or computed column)
- Check constraints that directly use uncontained entities or functions
- Numbered procedures
- Computed columns that directly use uncontained entities or functions
- Schema-bound objects that depend on built-in functions with collation changes
- Binding change resulting from collation changes, including references to objects, columns, symbols or types
Tomorrow, we will move this newly created database to another SQL Server instance, and see how easy it can be.
Until tomorrow,
Be courteous. Drive responsibly.

