Developing SSIS packages is quite easy – it’s mostly drag and drop and some minor configuration, which is a really boon for someone who is new to SSIS. However, when it comes to tuning the package, one needs to understand the finer points of each task on the control flow.
The OLE DB Destination
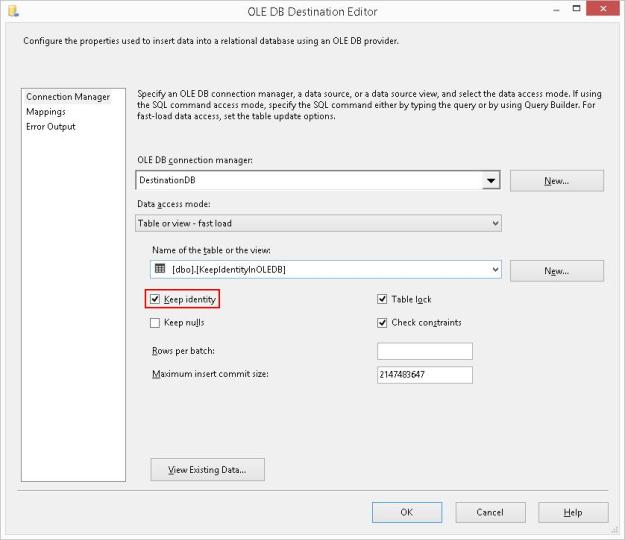
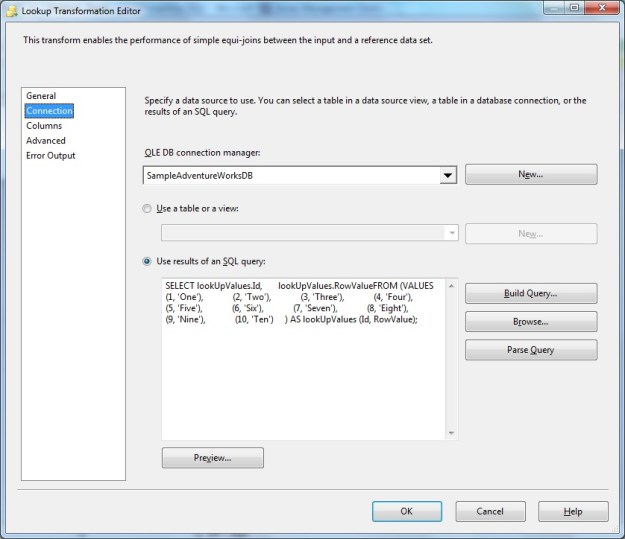
In one of my previous posts, I started to explore the OLE DB destination. In order to load data as quickly into the destination as possible, the OLE DB destination allows us to use a “Fast Load” mode. The “Fast Load” option allows the data team to configure various options that affect the speed of the data load:
- Keep Identity
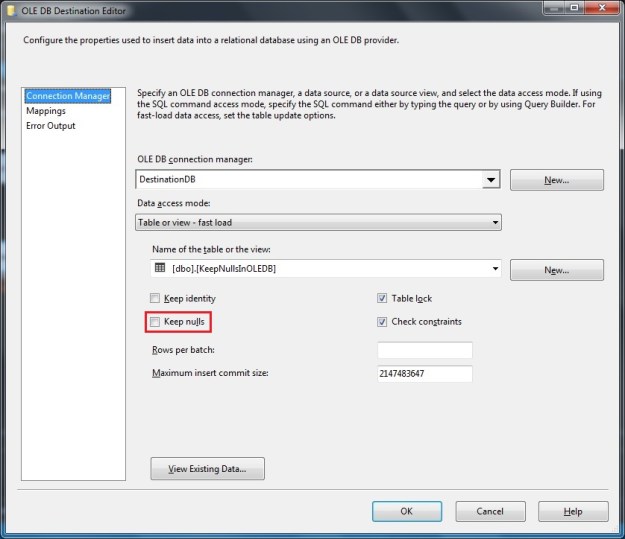
- Keep NULLs
- Table Lock
- Check Constraints
- Rows per Batch
- Maximum Insert Commit Size
I looked at the “Keep NULLs” and the “Keep Identity” options earlier, and today I will go over the “Table Lock” option.
Because the option is part of the OLE DB destination task, the “Table Lock” option indicates whether the database engine should request a more wider lock on the entire table (i.e. use TABLOCK) rather than trying to get granular locks one each row/page and then follow lock escalation to block the table.
Theoretically, when moving extremely large amounts of data compared to the number of records already available in the destination table, the database engine would deem the granular locks (at the row/page level) too cost prohibitive and escalate to the table anyway. In this case, it would be better to specify the wider TABLOCK.
Allow me to present a brief demo.
Creating the package with logging for comparing execution time
As always, I have created a simple package that creates a table and inserts data into it. The table is identical to the [Sales].[SalesOrderDetail] table in the [AdventureWorks2014] sample database. The table creation script used in the Execute SQL task on the package is provided below:
USE [tempdb];
GO

IF OBJECT_ID('[dbo].[SalesOrderDetail]','U') IS NOT NULL
BEGIN
    DROP TABLE [dbo].[SalesOrderDetail];
END
GO

CREATE TABLE [dbo].[SalesOrderDetail]
   (
    [SalesOrderID]           [INT]              NOT NULL,
    [SalesOrderDetailID]     [INT]              NOT NULL,
    [CarrierTrackingNumber]  [NVARCHAR](25)         NULL,
    [OrderQty]               [SMALLINT]         NOT NULL,
    [ProductID]              [INT]              NOT NULL,
    [SpecialOfferID]         [INT]              NOT NULL,
    [UnitPrice]              [MONEY]            NOT NULL,
    [UnitPriceDiscount]      [MONEY]            NOT NULL
                             CONSTRAINT [DF_sodUnitPriceDiscount]  DEFAULT ((0.0)),
    [LineTotal]              DECIMAL(38, 6),
    [rowguid]                [UNIQUEIDENTIFIER] NOT NULL,
    [ModifiedDate]           [DATETIME]         NOT NULL
                             CONSTRAINT [DF_sodModifiedDate]  DEFAULT (GETDATE())
   ) ON [PRIMARY]
GO
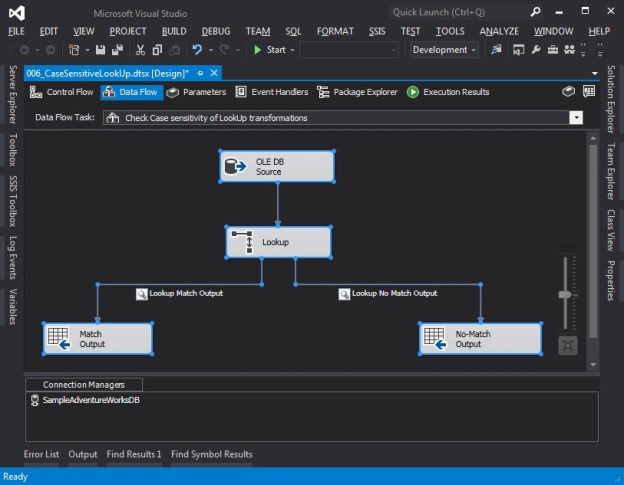
Once the table is created, the package “flows” to the Data Flow Task. Inside the data flow, essentially I simply select about 4 times the data from the [AdventureWorks2014].[Sales].[SalesOrderDetail] table (approximately 485268 rows) using an OLE DB source and pump it to the newly created target table via an OLE DB destination with the “Table Lock” option checked (default).
I then configure logging on the package to log the package activity for the Data Flow Task for the OnError, OnPreExecute and OnPostExecute events (Configuring package logging is out of scope for this blog post).
The script used in the OLEDB source is presented here:
USE AdventureWorks2014;
GO
SELECT sod.SalesOrderID,
       sod.SalesOrderDetailID,
       sod.CarrierTrackingNumber,
       sod.OrderQty,
       sod.ProductID,
       sod.SpecialOfferID,
       sod.UnitPrice,
       sod.UnitPriceDiscount,
       sod.LineTotal,
       sod.rowguid,
       sod.ModifiedDate
FROM Sales.SalesOrderDetail AS sod
CROSS JOIN (VALUES (1), (2), (3), (4)) AS Combinations (ComboValue)
GO
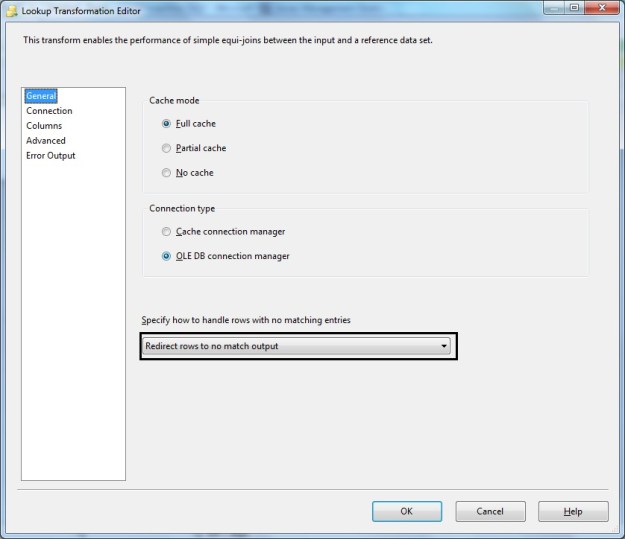
A set of screenshots showing the package configuration described above are shown below.

An “Execute SQL Task” creates the test table
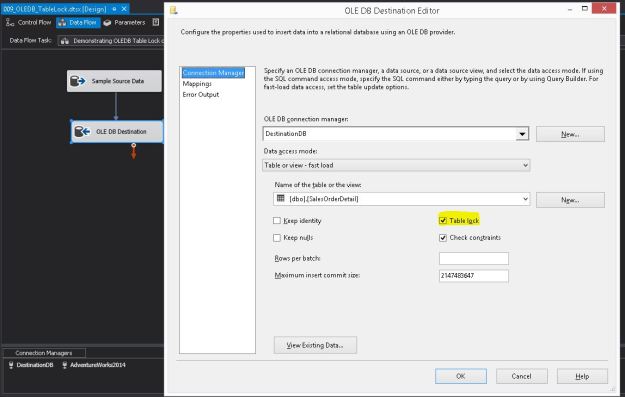
The OLE DB destination in “Fast Load” configuration with “Table Lock” checked (default)

Package Log configuration enabled for the OLEDB destination
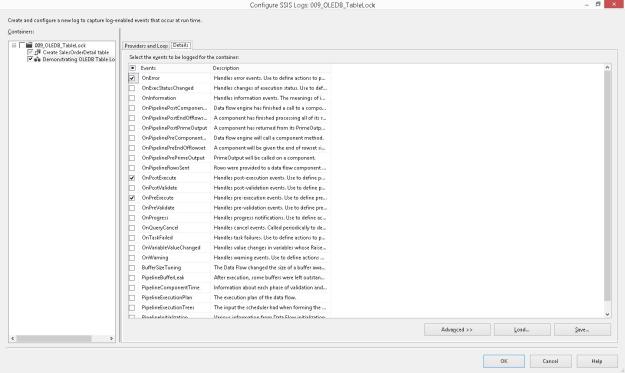
Event configuration done to log task activities as part of package logging
Once the package is executed, I will compare the difference between the OnPreExecute and OnPostExecute times for both configurations of the “Table Lock” option to get an idea of the performance difference between them.
NOTE: The packages were executed after it was confirmed that the databases involved (in this case tempdb) had grown sufficiently to accommodate the inserted data.
Confirming that we are indeed taking a Table Lock
While the package is executing in SQL Server Data Tools (SSDT, erstwhile BIDS), I run the following query on the SQL Server to check the locks occupied on our test table.
USE [tempdb]
GO
SELECT tl.resource_associated_entity_id AS ObjectId,
       OBJECT_NAME(tl.resource_associated_entity_id) AS ObjectName,
       tl.request_mode AS LockRequestMode
FROM [sys].[dm_tran_locks] AS tl
WHERE tl.resource_database_id = DB_ID()
  AND tl.resource_associated_entity_id = OBJECT_ID('[dbo].[SalesOrderDetail]','U');
GO
Based on the results, we can confirm that an exclusive Bulk Update (BU) lock has indeed been requested and granted on the table – indicating that the TABLOCK option was used as part of the insert.

Bulk Update (BU) lock used on the table, indicating use of TABLOCK (Table Lock)
Running the package with “Table Lock” turned Off
If I check the locks on the table while running the package with the “Table Lock” option unchecked, I see that either an “Intent Exclusive” (IX) or an “Exclusive” (X) lock have been used. This indicates that SQL Server is actually using Exclusive locks on lower level allocation units (page/row).

When “Table Lock” is unchecked, an Intent Exclusive Lock is acquired on the table, indicating granular exclusive locks in use
Please note that between each run, the data buffers were cleaned and procedure cache was cleared out to get a “cold” state performance of the database engine.
CHECKPOINT;
DBCC DROPCLEANBUFFERS;
DBCC FREEPROCCACHE;
GO
Comparing package execution performance
Because I had turned on logging on the SSIS package, I ran the following query against the [dbo].[sysssislog] table which gives me the time difference (in seconds) between the “OnPreExecute” and “OnPostExecute” events for both the packages. The query and the results are available below:
USE [tempdb];
GO
SELECT [PivotedTbl].,
       DATEDIFF(SECOND,
                [PivotedTbl].[OnPreExecute],
                [PivotedTbl].[OnPostExecute]
               ) AS PackageRunTimeInSeconds
FROM (SELECT sl.,
             sl.[event],
             sl.[starttime]
      FROM [dbo].[sysssislog] AS sl
     ) AS [SourceTbl]
PIVOT (MAX([SourceTbl].[starttime])
       FOR [SourceTbl].[event] IN ([OnPreExecute],[OnPostExecute])
      ) AS [PivotedTbl];
GO

Execution time summary showing data flow with OLE DB destination using Table locks completes faster than one using granular locks
We can clearly see that the table load with “Table lock” checkbox turned on is comparatively faster.
Summary
The OLE DB destination task is a very powerful way to load data into SQL Server table. It also provides the flexibility to boost the rate of data insertion when used wisely.
- When loading data into an empty table or when system is under an outage window, evaluate keeping the “Table Lock” checkbox checked
- When it is important to keep the tables accessible during the data load, evaluate keeping the “Table Lock” checkbox unchecked
- This will ensure that if possible, the SELECT queries are not blocked from being executed as long as they do not refer to the same page(s) being inserted/updated
- Using a higher-level lock (in case of requesting a Table Lock/TABLOCK) does provide a reduced data “load” time due to reduced overhead of maintaining granular locks and can be used as a means to speed up the data inserts for large data sets
References:
- Lock Modes in SQL Server [MSDN Link]
- Lock Compatibility [MSDN Link]
- Performance – Best Practice – Create Index Before or After a data insert? [Blog Link]
- Performance – Best Practice – Create Index Before or After a data insert – I/O, Fragmentation, CPU and Elapsed Time [Blog Link]
Until we meet next time,
Be courteous. Drive responsibly.