Tag Archives: Series

Articles that are too big to fit into one part.

#0396 – SQL Server – SSIS – Move and rename a file – “Could not find part of the path.” File System Task error


When working with disconnected sources or remote systems in SSIS, source data is often received in the form of files. A common requirement is to rename the file once the data import/processing is completed.

I looked at the File System task in my previous post. The file system task appears to be the best way to implement this requirement. However, we run into something that is unexpected:

The “Move File” operation moves a file from one folder to another. It does not rename the file.

Basic Scenario

Let me leverage the same example as I had in my previous post. I have a set of files in a folder and an SSIS package that is configured to rename the files.

Folder with input files which need to be renamed once processing is complete

Folder with input files which need to be renamed once processing is complete

The destination file name comes from an expression that uses basic string concatenation to achieve the required target file name. The expression used in the destination file name variable is provided below.

@[User::SourceFolder] + 
SUBSTRING(@[User::FileName], 1, FINDSTRING(@[User::FileName],".",1) -1 ) + (DT_WSTR,4)YEAR(GETDATE()) + (DT_WSTR,2)MONTH(GETDATE()) + (DT_WSTR,2)DAY(GETDATE()) + 
SUBSTRING(@[User::FileName], FINDSTRING(@[User::FileName],".",1), LEN(@[User::FileName]))
Variable to populate the new name for the output file using an Expression

Variable to populate the new name for the output file using an Expression

Move File Operation

The File System Task in this package has been designed to use variables as the source and destination file names. The File System task is configured to perform a “Move File” operation.

0396-sqltwins-filesystemtask-configured-for-move-file-operation

File System Task in the “Move File” configuration

Upon running the SSIS package, no files are processed and we run into an error.

0396-sqltwins-filesystemtask-move-file-configuration-error

Execution Error when running the File System Task

0396-sqltwins-filesystemtask-move-file-configuration-error-details

“Could not find a part of the path.” error in the File System task “Move File” configuration

Looking at the error in detail, we see that the error is:

Could not find a part of the path.

Using the Rename File configuration

If we change the operation type to the “Rename File” configuration, we can see that the movement is successful.

File System Task configuration using

File System Task configuration using “Rename File” mode where input & output file names are supplied via variables

0396-sqltwins-result-of-renamefile-configuration

Moving files using File System task with “Rename File” operation

Behind the scenes

So, why is the File System task not behaving as expected? If the File System configuration is set to “Move File”, why did the files not move to the target folder?

The reason is quite simple: “Move File” only moves a file – it cannot rename a file during the movement of the file.

In  short, one has to configure the File System task in a “Rename File” configuration if a file has to be renamed – irrespective of whether the rename is in-place or in a different folder.

Until we meet next time,

Be courteous. Drive responsibly.

Advertisement

#0395 – SQL Server – SSIS – Adding date and time to a file name after processing


As we have been discussing over the last couple of weeks, moving data from a “source” to a “destination” is the crux of SSIS. The data source can be literally anything – a SQL Server  database, a web-service, a script, an XML or even a conventional delimited file.

Picking up files from a folder and processing them is one of the most common use-case that I have seen. In order to avoid processing the same file over and over again, the most common requirement is to append the file name with a date-time value. In this post, I will provide an expression I use to achieve this goal.

Appending a Date/Time and renaming a file in SSIS

The easiest way to append a date/time value to a file name and renaming the file in SSIS is via SSIS expressions.

Put every simply – an expression is a formula, a combination of variables, literals and operators that work together and evaluate to a single value.

We can use the following expression to yield a date value:

SUBSTRING(@[User::FileName], 1, FINDSTRING(@[User::FileName],".",1) -1 ) + (DT_WSTR,4)YEAR(GETDATE()) + (DT_WSTR,2)MONTH(GETDATE()) + (DT_WSTR,2)DAY(GETDATE())

This can then be appended to the file name and a simple File System Task can rename the file for us on the file system. Let’s see this in action with an example.

Demo

Assume a scenario where I have a set of files in a folder, and I need to do some processing on them. After processing, I need to update the file names with the date. For the sake of brevity of this example, I will not be performing any other operation on the files other than renaming them.

My folder containing the input files looks like this:

Folder with input files which need to be renamed once processing is complete

Folder with input files which need to be renamed once processing is complete

Now, I create an SSIS package that contains a simple For Each file iterator and a File System task.

For Each Loop configuration

The For Each Loop (configured as a file iterator) uses an expression populated by a variable to get the source directory information.

The file name and extension is fetched into a variable which will be used during the processing and subsequent renaming.

0395-sqltwins-overall-package

Overall package configuration showing the For Each File Iterator

0395-sqltwins-foreachloop-collection-configuration

For Each Iterator – Collection configuration using a variabel for the source directory

0395-sqltwins-foreachloop-fetching-file-name

Fetching the individual file name & extension into a variable

Now, I create a new user variable “OutputFileName” and use the expression below to generate the output file name. The expression has essentially 3 distinct parts:

  1. Fetch the file name (without the extension)
  2. Append the date to this string
  3. Fetch the file extension and append to the modified/new file name
@[User::SourceFolder] + 
SUBSTRING(@[User::FileName], 1, FINDSTRING(@[User::FileName],".",1) -1 ) + (DT_WSTR,4)YEAR(GETDATE()) + (DT_WSTR,2)MONTH(GETDATE()) + (DT_WSTR,2)DAY(GETDATE()) + 
SUBSTRING(@[User::FileName], FINDSTRING(@[User::FileName],".",1), LEN(@[User::FileName]))
Output File Path expression

Output File Path expression

This variable is now used in the configuration of the file system task which is responsible for renaming the file.

File System Task configuration

The file system task is an extremely flexible task component in SSIS. It can operate on the file system not only by using file connections but also on the basis of variables! For our problem, we will leverage this flexibility of the File System task.

As can be seen from the screenshot below, my File System task has been configured as follows:

  • Source File Path is a variable
  • Destination File Path is a variable
  • File Operation type = “Rename File”

The “Rename File” operation renames the file specified by the old file path and renames it to the name specified by the new file path.

File System Task configuration using “Rename File” mode where input & output file names are supplied via variables

Once the package is executed, we can see that the files in the source folder are now updated as expected.

Source Folder with the File Names updated as expected

Source Folder with the File Names updated as expected

Further Reading

Until we meet next time,

Be courteous. Drive responsibly.

High-level usage of the File Ordering script task

#0394 – SQL Server – SSIS – ForEach Loop – Controlling processing order


One of the SSIS related questions that I see often in the forums is around the ability to control the sequence in which a For Each Loop processes the files from a directory. When performing data movement as part of an ETL or an integration, it may be required to work asynchronously. The “sender” of the data may place the files in a folder for the data processing to pickup. These files generally contain ordered data that needs to be loaded in a specific sequence.

The problem is that the SSIS For Each Loop container does not have the provision that allows a user to specify the order in which the files are to be processed. Today, I present one of the workarounds that I came up with (there may be others, and I would be very interested to know what do you prefer in these scenarios).

Environment Prep

To demonstrate the ordered loading of files, I created a set of simple files  and a table to which I will be adding the data read from these files.

USE [tempdb];
GO

IF OBJECT_ID('dbo.ImportedData','U') IS NOT NULL
BEGIN
    DROP TABLE dbo.ImportedData;
END
GO


CREATE TABLE dbo.ImportedData 
   (RecordId           INT          NOT NULL IDENTITY(1,1),
    ProcessedFileName  NVARCHAR(255) NOT NULL,
    RecordValue        NVARCHAR(100)     NULL,
    ProcessedDate      DATETIME     NOT NULL,
    CONSTRAINT pk_ImportedData PRIMARY KEY CLUSTERED (RecordId, ProcessedDate)
   );
GO

To demonstrate the fix, I will not be processing the files in order of their file names, but I will instead be processing them in order of  the date on which they were last saved. The screenshot below shows the order in which files will be processed.

Folder showing files to process in the required non-alphabetical order

Folder showing files to process in the required non-alphabetical order

Core Logic – Identify the Order of the Files to Process

The For Each container is just a mechanism to loop through a set (of objects/files/records). It does not have the provision to control the order in which the set is to be iterated through.

Hence, the workaround that I came up with was to supply a pre-ordered set to the For Each container. I therefore used a script task to order the filenames in a recordset object which I will pass to the For Each container.

As shown below, I pass the path to the folder where the files are located, and accept the sorted list into an object.

High-level usage of the File Ordering script task

High-level usage of the File Ordering script task

The script used within the script task which is also the heart of this solution is provided below.

public void Main()
{
    // TODO: Add your code here
    DirectoryInfo di = new DirectoryInfo((string)Dts.Variables["User::FolderPath"].Value);
    List<string> files = new List<string>();

    foreach (var fi in di.EnumerateFiles().OrderBy(t=>t.LastWriteTime))
    {
        files.Add(fi.FullName);
    }

    Dts.Variables["User::FileListing"].Value = files;

    Dts.TaskResult = (int)ScriptResults.Success;
}

Process the File

The  next stage is simply to process the file.

  • The sorted set of files is iterated upon by the For Each container
  • I have a script task that simply prints out a message box with the file being processed currently
  • The data flow task simply reads from the file and writes to a conventional OLE DB destination

Screenshots showing these bits of the configuration are provided below.

0394-sqltwins-ssis-foreachcontainer

For Each Loop Iteration Configuration

0394-sqltwins-ssis-foreachcontainer2

For Each Loop File Name configuration

0394-sqltwins-ssis-dfd_fileconnection

Setting the file connection based on the File Name set by For Each Iterator

If I execute the SSIS package and then query the destination table, we see that the files were indeed ordered in the expected order.

USE [tempdb];
GO
SELECT * 
FROM dbo.ImportedData 
WHERE RecordValue LIKE '%1%';
GO
0394-sqltwins-ssis-output

Output of script to confirm that data was loaded in the required sequence

Further Reading

Until we meet next time,

Be courteous. Drive responsibly.

OLE DB Destination - Rows/Batch and Max. Insert Commit Size

#0393 – SQL Server – SSIS – OLE DB Destination – Table Fast Load – Rows per batch and Max. Insert Commit Size options


Developing SSIS packages is quite easy – it’s mostly drag and drop and some minor configuration. However, when it comes to tuning the package, one needs to understand the finer points of each task on the control flow. On each task, there are some options that help improving the performance of the data flow, whereas some others help regulate the quality of data being migrated.

The OLE DB Destination

I have been writing about the OLE DB destination in the last couple of posts. In order to load data as quickly into the destination as possible, the  OLE DB destination allows us to use a “Fast Load” mode. The “Fast Load” option allows the data team to configure various options that affect the speed of the data load:

  1. Keep Identity
  2. Keep NULLs
  3. Table Lock
  4. Check Constraints
  5. Rows per Batch
  6. Maximum Insert Commit Size

When we use the fast load options of the OLE DB destination, we are essentially using the BULK INSERT T-SQL command. This is the reason we get almost all the options of BULK INSERT in the OLE DB transformation. Today, I will take a look at the last two options which are the secret behind significantly improving the data load performance on a system with a slow I/O subsystem. These are “Rows per Batch” and “Maximum Insert Commit Size”.

My test instance is on my prime development environment and hence even the reasonably large load completes in a couple of minutes. However, on a slow I/O sub-system, the impact of these options will be much higher.

Creating the package with logging for comparing execution time

I have created a simple package that creates a table and inserts data into it. The table is identical to the [Sales].[SalesOrderDetail] table in the [AdventureWorks2014] sample database. The table creation script used in the Execute SQL task on the package is provided below:

USE [tempdb];
GO

IF OBJECT_ID('[dbo].[SalesOrderDetail]','U') IS NOT NULL
BEGIN
    DROP TABLE [dbo].[SalesOrderDetail];
END
GO

CREATE TABLE [dbo].[SalesOrderDetail]
   (
    [SalesOrderID]           [INT]              NOT NULL,
    [SalesOrderDetailID]     [INT]              NOT NULL,
    [CarrierTrackingNumber]  [NVARCHAR](25)         NULL,
    [OrderQty]               [SMALLINT]         NOT NULL,
    [ProductID]              [INT]              NOT NULL,
    [SpecialOfferID]         [INT]              NOT NULL,
    [UnitPrice]              [MONEY]            NOT NULL,
    [UnitPriceDiscount]      [MONEY]            NOT NULL 
                             CONSTRAINT [DF_sodUnitPriceDiscount]  DEFAULT ((0.0)),
    [LineTotal]              DECIMAL(38, 6),
    [rowguid]                [UNIQUEIDENTIFIER] NOT NULL,
    [ModifiedDate]           [DATETIME]         NOT NULL 
                             CONSTRAINT [DF_sodModifiedDate]  DEFAULT (GETDATE())
   ) ON [PRIMARY]
GO

Once the table is created, the package “flows” to the Data Flow Task. Inside the data flow, essentially I simply select about 35,181,930 records by using a CROSS JOIN between the [AdventureWorks2014].[Sales].[SalesOrderDetail] and [AdventureWorks2014].[HumanResources].[Employee] tables using an OLE DB source and pump it to the newly created target table via an OLE DB destination with the “Table Lock” option checked (default).

I then configure logging on the package to log the package activity for the Data Flow Task for the OnError, OnPreExecute and OnPostExecute events (Configuring package logging is out of scope for this blog post).

The script used in the OLEDB source is presented here:

SELECT sod.SalesOrderID,
       sod.SalesOrderDetailID,
       sod.CarrierTrackingNumber,
       sod.OrderQty,
       sod.ProductID,
       sod.SpecialOfferID,
       sod.UnitPrice,
       sod.UnitPriceDiscount,
       sod.LineTotal,
       sod.rowguid,
       sod.ModifiedDate
FROM Sales.SalesOrderDetail AS sod
CROSS JOIN HumanResources.Employee AS hre;
GO

Screenshots showing the package configuration described above are shown below.

OLEDB Destination - Package Overview to test Rows/Batch and Max. Insert Commit Size

OLEDB Destination – Package Overview to test Rows/Batch and Max. Insert Commit Size

Please note that between each run, the data buffers were cleaned and procedure cache was cleared out to get a “cold” state performance of the database engine.

CHECKPOINT;
DBCC DROPCLEANBUFFERS;
DBCC FREEPROCCACHE;
GO

Once the package is executed, I will compare the difference between the OnPreExecute and OnPostExecute times for various configurations of the “Row per batch” and “Max. insert commit size” option to get an idea of the performance difference between them.

NOTE: The packages were executed after it was confirmed that the databases involved (in this case tempdb) had grown sufficiently to accommodate the inserted data.

Comparing package execution performance

Because I had turned on logging on the SSIS package, I ran the following query against the [dbo].[sysssislog] table which gives me the time difference (in seconds) between the “OnPreExecute” and “OnPostExecute” events for both the packages. The query and the results are available below:

USE [tempdb];
GO
SELECT [PivotedData].,
       [PivotedData].[OnPreExecute],
       [PivotedData].[OnPostExecute],
       DATEDIFF(SECOND,[PivotedData].[OnPreExecute],[PivotedData].[OnPostExecute]) AS [ExecutionTime]
FROM (SELECT [sl].,
             [sl].[event],
             [sl].[starttime]
      FROM [dbo].[sysssislog] AS [sl] WITH (NOLOCK)
      WHERE ([sl].[event] = 'OnPreExecute' 
             OR 
             [sl].[event] = 'OnPostExecute'
            )
        AND [sl]. LIKE 'OLEDB%'
     ) AS SourceData
PIVOT (MAX([SourceData].[starttime])
       FOR [SourceData].[event] IN ([OnPreExecute], [OnPostExecute])
      ) AS PivotedData;
GO
OLEDB Destination - Performance impact of adjusting Rows/Batch and Max. Insert Commit Size

OLEDB Destination – Performance impact of adjusting Rows/Batch and Max. Insert Commit Size

As can be seen from the screenshots off the results, the tasks with controlled batch sizes and rows/batch had better performance even on my development environment. I have seen a considerable improvement on systems with poor I/O performance.

Conclusion

The OLE DB destination is, therefore, a very powerful way of tuning the data inserts into a destination SQL Server database.

There is no magic bullet to ensuring SSIS performance, but a thorough evaluation of and appropriate adjustments to the OLEDB destination options based on business rules, overall system configuration and the nature of the workload is sure to get the optimal performance from your packages.

Further Reading

Until we meet next time,

Be courteous. Drive responsibly.

#0392 – SQL Server – SSIS – OLE DB Destination – Table Fast Load – Check Constraints option


Developing SSIS packages is quite easy – it’s mostly drag and drop and some minor configuration, which is a really boon for someone who is new to SSIS. However, when it comes to tuning the package, one needs to understand the finer points of each task on the control flow. On each task, there are some options that help improving the performance of the data flow, whereas some others help regulate the quality of data being migrated.

The OLE DB Destination

I have written about the OLE DB destination. In order to load data as quickly into the destination as possible, the  OLE DB destination allows us to use a “Fast Load” mode. The “Fast Load” option allows the data team to configure various options that affect the speed of the data load:

  1. Keep Identity
  2. Keep NULLs
  3. Table Lock
  4. Check Constraints
  5. Rows per Batch
  6. Maximum Insert Commit Size

Today, I will take a look at the “Check Constraints” option which controls the quality of the data “flowing” through the data flow task.

Leveraging Constraints in SQL Server

Before I go ahead and demonstrate the effect of the “Check Constraints” checkbox on the OLE DB Destination, I will reiterate the usage of constraints in Microsoft SQL Server table design. SQL Server supports multiple types of constraints, helping in maintaining data quality – both referential and domain:

  • NOT NULL constraint – Prevents NULL values in a column
  • UNIQUE constraint – Ensures values in a column are unique
  • PRIMARY KEY – Uniquely identifies a row in a table
  • FOREIGN KEY – They identify and enforce relationships between tables
  • CHECK constraint – Checks the values being inserted against a defined set of business rules for valid data range values in the column
  • DEFAULT constraint – Ensures that when an explicit value is not specified by the client, a default value is used so as not to break logical integrity of the data

Constraints that enforce referential and domain integrity are a physical implementation of the entity relationship and logical database design. As businesses grow and system architectures evolve, valid values for various enumerations also change and evolve. Values valid for a domain are enforced in the physical design via CHECK constraints.

Historical data may or may not confirm to the values enforced by current CHECK constraints today. For example, an expense workflow may have multiple stages which may not have existed in the past. While current data in the transaction systems would have been updated to confirm to the new enumerations, the historical data may still be as-is, i.e. valid in the past, but invalid today.

Check constraints and OLE DB Destination in SSIS

When moving such data over to a warehouse, the data transfer is a bulk data movement. By default, Microsoft SQL Server does not check constraints when loading data in bulk. SSIS allows you to control this behaviour when using the OLE DB transformation.

Demo

For this demo, I have a fairly simple scenario – a user registration table that enforces the following simple rules:

  • A basic check for the validity of E-mail address
  • The user registering must be 18 years in age or older

These checks are enforced by using CHECK constraints, and the DDL is provided below for your kind reference.

USE tempdb;
GO

--Safety Check
IF OBJECT_ID('dbo.UserRegistration','U') IS NOT NULL
BEGIN
    DROP TABLE dbo.UserRegistration;
END
GO

CREATE TABLE dbo.UserRegistration 
            (UserId         INT         NOT NULL IDENTITY(1,1),
             UserName       VARCHAR(20) NOT NULL,
             UserPassword   VARCHAR(20) NOT NULL,
             UserEmail      VARCHAR(50)     NULL,
             UserBirthDate  DATE        NOT NULL
            );
GO

--Primary Key
ALTER TABLE dbo.UserRegistration
    ADD CONSTRAINT pk_UserRegistrationUserId PRIMARY KEY CLUSTERED (UserId);
GO

--User must have a valid E-mail 
--(basic checking done here)
ALTER TABLE dbo.UserRegistration
    ADD CONSTRAINT chk_UserRegistrationUserEmail 
        CHECK (UserEmail LIKE '[a-z,0-9,_,-]%@[a-z,0-9,_,-]%.[a-z][a-z]%');
GO

--User must be at least 18 years in age
ALTER TABLE dbo.UserRegistration
    ADD CONSTRAINT chk_UserRegistrationBirthDate 
        CHECK (DATEDIFF(YEAR,UserBirthDate,GETDATE()) >= 18);
GO

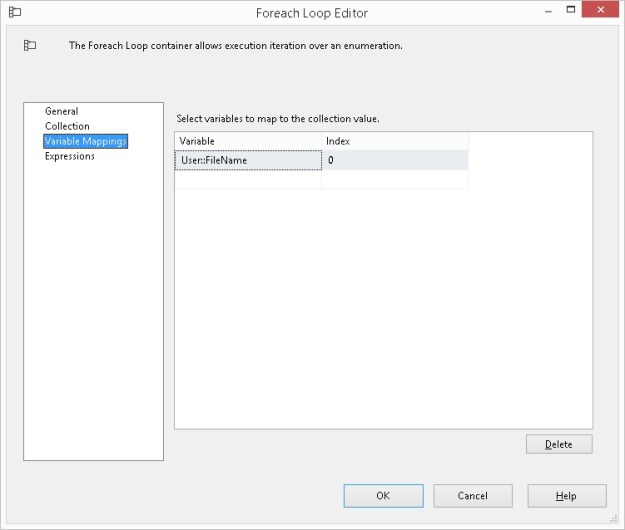
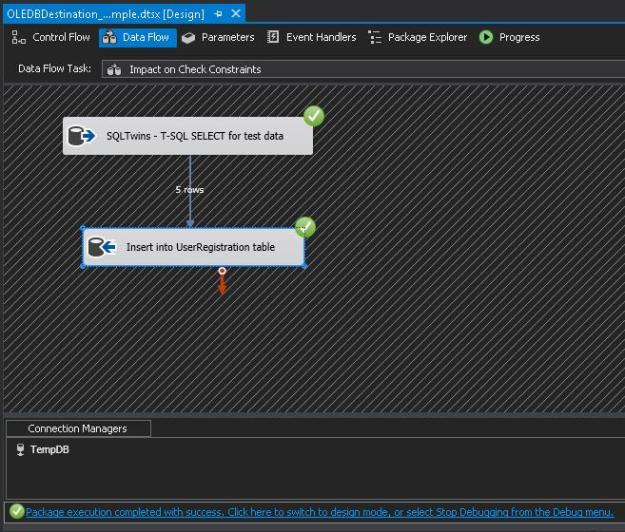
In my SSIS package, I have used a standard data flow task. The OLE DB source uses a query that creates some valid and invalid data which I would like to insert into the destination [dbo].[UserRegistration] table. Below is the T-SQL query used for the source and screenshots of my data flow task.

SELECT TestData.UserName, 
       TestData.UserPassword, 
       TestData.UserEmail, 
       TestData.UserBirthDate
FROM 
(VALUES --Valid Data
    ('SQLTwins1','SQLTwins@Pwd1','validEmail1@somedomain.com','1960-01-01'),
    ('SQLTwins2','SQLTwins@Pwd2','validEmail2@somedomain.com','1970-01-01'),
    --Invalid Email
    ('SQLTwins3','SQLTwins@Pwd3','invalidEmail@somedomain'   ,'1970-01-01'),
    --Invalid BirthDate
    ('SQLTwins4','SQLTwins@Pwd4','validEmail4@somedomain'    ,'2016-01-01'),
    --Invalid Email & BirthDate
    ('SQLTwins5','SQLTwins@Pwd5','invalidEmail'              ,'2016-01-01')
) AS TestData (UserName, UserPassword, UserEmail, UserBirthDate);
OLE DB Source for checking bypass of the check constraints during bulk inserts

OLE DB Source for checking bypass of the check constraints during bulk inserts

0392-sqltwins-ssis-checkconstraints-oledbdestination

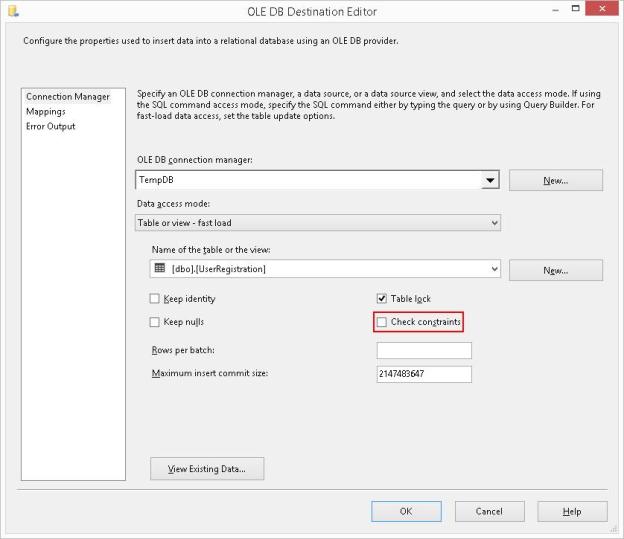
OLE DB Destination with Fast Load options, notice the “Check constraints” is checked by default

Notice that by default, the CHECK Constraints checkbox is checked. When I run the package by keeping CHECK constraints enabled, the package fails during execution.

SSIS Package failure when one or more input values violate CHECK constraints

SSIS Package failure when one or more input values violate CHECK constraints

Looking at the package progress log, I can confirm that the package failed because the data violated check constraints when inserting into the table. The error has been formatted below to enhance readability.

[Insert into UserRegistration table [2]] Error: SSIS Error Code DTS_E_OLEDBERROR.  
An OLE DB error has occurred. Error code: 0x80004005.

An OLE DB record is available.  Source: "Microsoft SQL Server Native Client 11.0"  
Hresult: 0x80004005  Description: "The statement has been terminated.".

An OLE DB record is available.  Source: "Microsoft SQL Server Native Client 11.0"  
Hresult: 0x80004005  
Description: "The INSERT statement conflicted with the CHECK constraint "chk_UserRegistrationUserEmail". 
             The conflict occurred in database "tempdb", table "dbo.UserRegistration", column 'UserEmail'.".

I now edit the package to uncheck the “Check Constraints” checkbox on the OLE DB Destination.

0392-SQLTwins-SSIS-CheckConstraints-OLEDBDestination_Unchecked.JPG

Unchecking the “Check constraints” checkbox on the OLE DB Destination

Running the package again results in success.

Successful Package Execution with “Check constraints” unchecked, i.e. data violating check constraints was successfully inserted

I now validate the data in the [dbo].[UserRegistration] table. I can see that data violating check constraints was successfully inserted.

USE [tempdb];
GO
SELECT [ur].[UserId],
       [ur].[UserName],
       [ur].[UserPassword],
       [ur].[UserEmail],
       [ur].[UserBirthDate]
FROM [dbo].[UserRegistration] AS [ur];
GO
Confirmation that constraints were not checked during insertion of data by the SSIS package

Confirmation that constraints were not checked during insertion of data by the SSIS package

Important Notes

  • Unchecking “Check Constraints” only turns off the checks for check constraints
  • Referential and other integrity constraints (NOT NULL, Foreign Key, Unique Key, etc) continue to be enforced

Conclusion

The OLE DB destination task is a very powerful way to load data into SQL Server table in a short duration of time. At the same time, it can also cause bad data to be inserted into the destination if not used wisely.

Turn the Check Constraints option off to optimize the data load when you are sure that:

  • Source data has expected discrepancies which are acceptable to the business/domain OR source data is correct
  • Re-validation of the check constraints will be done as a post migration process to make all constraints trusted (disabling check constraints would have marked them as non-trusted)

Further Reading:

Until we meet next time,

Be courteous. Drive responsibly.